Archive for the ‘Insects and Bugs’ Category
Letter of the Week- Letter A
Sep
Last week was our first official week of Tot School. I have been doing crafts and learning activities with Hailey for a while but I decided that with the new school year I would start doing Tot School with her- which is basically just like pre-school except on a 2 year old level. I am going to break up our activities we do by category when I post about them- for example today I am going to share with you all of our letter activities we did last week. Then on the other days I will share with you our activities related to our theme, number, shape, color and Bible story.
So, our letter last week was the letter A- here are some of the activities I did with Hailey to help her learn the letter A.

On the first day we colored this Letter A Template. Hailey wasn’t feeling very well and I ended up doing most of the coloring.

Then I glued the A onto a piece of construction paper. The letter of the week paper will hang on our refrigerator all week since that it a high traffic area and I want Hailey to see it as often as possible.

For our next letter A activity- you will need a large A on a piece of construction paper, another piece of construction paper, red paint and an apple cut in half.

Dip the apple in the red paint and stamp it onto the letter A.

Cut the A out and glue onto a different color piece of construction paper. This also hangs on our refrigerator.

We also made this Letter A Book.

We played a hide the letter A game as well. I have a lot of felt and foam letters so I hid several A’s around our living room. Here is Hailey finding one of the A’s in the trunk of her car.
We also did the Letter A activities on the Star Fall website which was one of Hailey’s favorite activities.
Lastly, we made this really cute ant- I saw the idea for this over at No Time for Flashcards.

Here’s what you’ll need: black paint (I don’t have black, so I mixed these colors together to try to get a dark color), paint brush, 2 pipe cleaners, scissors, 1 section of egg carton that is three pieces long and 1 section that is just one piece, and wiggle eyes (I used black and white construction paper to make the eyes because our last project that had wiggle eyes on them- Hailey pulled them off and tried to eat them, so we aren’t ready for wiggle eyes yet)

Paint the egg carton. Why yes, Hailey did eat some paint- how could you tell?
After the paint had dried- cut two holes in the top of the 1 piece of egg carton and thread pipe cleaner through to create antenna. Then add your eyes to that piece. Cut holes in the three piece section of egg carton to thread pipe cleaner through for the legs. Then glue the head piece right on top of the first section.

Here is the finished ant.
From Caterpillar to Butterfly
Sep
In case anyone is wondering what else we do around here besides crafts, I thought I’d share. Caterpillars and butterflies have been our theme for the last 2 weeks. We did several caterpillar art projects (Paper Towel Caterpillar, Caterpillar Name and an Egg Carton Caterpillar) as well as several butterfly art projects (Coffee Filter Butterflies, Butterfly Finger Painting and a Butterfly Sun Catcher).
In addition to our crafts we did the following activities:

We played a butterfly counting and matching game.
Hailey practiced spelling her name on butterfly shaped paper. (Side note- I usually only use uppercase for the first letter in her name and lowercase for the rest. But I had these completely made and covered in contact paper before I realized I had used all uppercase letters and I was not going to re-do it.)
We also read a lot of caterpillar and butterfly books. While I thought some of these might be too old for Hailey she loved them. Here are some of her favorites:

“My, Oh My–A Butterfly!: All About Butterflies” by Tish Rabe

“The Very Hungry Caterpillar” by Eric Carle
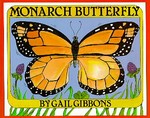
“Monarch Butterfly” by Gail Gibbons

“The Butterfly Alphabet” by Kjell B Sandved
I made some butterfly life cycle sequencing cards for Hailey too. She enjoyed naming the stages but didn’t understand the concept of putting them order, which I did not expect her to, but it was fun anyways. If you’re interested in the cards I used- you can get them here –> butterfly life cycle sequencing cards.
And the main focus of our caterpillar to butterfly theme was this:

Day 1

Day 3

Day 5

Day 8

Day 13

Later on in the day of Day 13

Day 16- we let the butterflies fly away.
So, that’s what we’ve been up to. This week we also started our official “Tot School” and I will be starting to post about our activities next week (I’m usually about a week behind in posting what we’ve been doing).
Butterfly Sun Catcher
Sep
This was a really simple butterfly craft that was a lot of fun.

Here’s what you’ll need: contact paper, scissors, marker and tissue paper.

Have your child rip the tissue paper into little pieces. It’s great for developing those fine motor muscles and toddlers love to rip things apart.

Cut your contact paper in half and then have your child put tissue paper on one half of the contact paper.

After your child finishes putting the tissue paper on, put the other piece of contact paper on the back of the 1st piece to keep all the tissue paper inside. Then I folded it in half and drew a kind-of butterfly shape.

Cut it out and hang your sun catcher on a window.
Butterfly Finger Painting
Sep
Here is a really simple butterfly craft you can do with a toddler of any age.

Here’s what you’ll need- finger paint and paper with half of a butterfly drawn on one side of the paper. Since you will be having your child paint only half of the paper and then folding the paper over to create a symmetrical print, make sure you fold the paper before hand to make it easier to fold over when it’s time for that step.

I folded the paper in half so that Hailey could only see the half of the paper I wanted her to paint because “only paint this side of the paper” would not have been a direction she would have followed. Then I had her paint just the one side of the paper. (My butterfly outline is actually on the other side of the paper so that I didn’t have to worry about being able to see it through the paint.)

Get to work finger painting. And also, in case you can’t tell by Hailey’s face, it’s best to eat some of the paint too. And apparently finger paint tastes better than Tempera paint because I literally had to pull Hailey’s fists out of her mouth with the finger paint. Then when I was trying to clean her up afterwards she was trying to lick the paint off her hands before I could wash it. Anyhoo…
Once your child is all done painting, open the paper up and then fold the paper over to create a print on the other half of the paper that is the same as the one your child just painted. Then hang it up to dry.
(Hint- I also had another piece of paper ready to be painted because I knew Hailey was going to want to try it again after she saw the results. And I was right.)

Here is Hailey’s finished butterfly.
