Archive for the ‘Toddler and Preschool Activities’ Category
Letter of the Week- Letter N
Mar
Last week our letter was N. Here are some of the activities we did:

Hailey made this N is for Nest from Totally Tots.

Hailey cut out some numbers for this page.

Hailey loves doing these playdough mats from Homeschool Creations for each letter.

She separated the capital and lowercase letters using this printable from Confessions of a Homeschooler.

Hailey worked on matching lowercase letters with the correct capital letter using this Gold Jumble from Musings of Me.

Hailey always loves doing this dinosaur puzzle with the alphabet on it.
Here are some of the things we did from Raising Rock Stars Preschool:

Hailey colored her verse for the week.

She cut her vocabulary words.

She practiced writing Nn.

Hailey really enjoys the power point part of RRSP! She’s pointing out her sight word of the week.

Decorating her craft- a treasure chest.

Adding some glitter glue.
Other:

Working on her Disney math workbook.
Fun Soap Experiment
Mar
I saw this over at Housing a Forest and we had to try it!

You’ll need a bar of Ivory soap and a microwave. Before we did the experiment we tested to see if the Ivory soap would sink or float- it floats. Then we tested the soap we usually use (Lever) and it sinks. In case you are curious- Ivory soap floats because it has air pumped into it while it is being made. But if you cut it in half you won’t find any air pockets.
So, get ready to stand by the microwave and watch this! Put it in for 2 minutes. Right around 20 seconds ours started to bubble.

This is the soap in the microwave. It isn’t smoking, that’s just the reflection of light on the microwave door.

Hailey watching. It had been in there for almost 2 minutes at this point.

When I opened the microwave door it shrunk a little bit, so it was actually a bit bigger than this.

This was such a fun experiment!


Shamrock Man
Mar
Here’s a few more things we did for St. Patrick’s Day.
Shamrock Man:

Hailey used her do-a-dot markers to make a face on the shamrock shape.

She taped pipe cleaner to the back of the shamrock shape and then taped shamrock shapes on for feet and hands.

Then Hailey cut some yarn for hair.

The finished shamrock man.
Some rainbow fun:

I had a printable in one of my Mailbox magazines for a rainbow with the correct color written in each row. Hailey glued squares of tissue paper on the correct spot.

The finished rainbow.
St. Patrick’s Day graphing:

I found this at Musings of Me. It was a fun graphing activity and Hailey loved it!

More Shamrock Fun
Mar
Here are a couple of activities that we did with shamrocks:

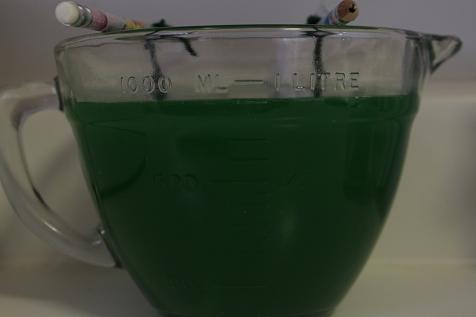
We wanted to try making a crystal shamrock and thought it would be fun if we could make the crystals green. I boiled 3 cups of water and we added 1/4 cup of borax (you can find it in the laundry aisle). We used a green piece of water coloring to turn the water green because we were all out of green food coloring.

Then we used white pipe cleaners and shaped them (as well as we could) like shamrocks. We tied them to a pencil and put them in the borax/water mixture. I put it where it would not be disturbed and left it until the next day.

The crystal shamrock. It did not end up looking very green (or a whole lot like a shamrock!), but it was fun anyways.
Then we made another shamrock.

Cut up some yarn- we used 2 different colors of green.
Then I mixed 1/2 cup of water and 1/4 cup of corn starch. Put it on the stove and slowly heat it. It starts out looking kind of milky and then it gets thick very quickly. Once it is thick, remove it from the heat.

Mix your yarn into the glue mixture.

Ideally we would have used a shamrock shaped cookie cutter, but I could not find one anywhere. So I used a sponge and did my best to cut out a shamrock shape. Take the yarn and wipe the excess glue off using your fingers (this part is messy so be ready with some paper towels!). Press into your shamrock shape. I have it laying on wax paper. Then I took another piece of wax paper to hold on the yarn while I removed the sponge.
Let it dry over night.

Our finished shamrock shape.
